
The last step I want to discuss, before we talk about actually producing content, is setting up two often overlooked yet very important sources of information about your site: Google Analytics and Google Search Console (formerly known as “Webmaster Tools”).
- Analytics will tell you about your site visitors, including what pages they look at, for how long, where on the planet they are located, what operating systems they use, and much much more.
- Search Console will tell you what one very important visitor to your site – Google itself – thinks of it. While there’s a trove of information here as well, the most important reason to hook up Webmaster Tools is to receive notifications if Google thinks there’s something wrong.
Both of these tools collect data over time. You’ll need to add a snippet of code for each to your WordPress site (I’ll walk you through it below) to allow that. Since nothing is collected until we take this step, it’s important that we do so as soon as practical.
You’ll need a Google account
Naturally, for these free Google-provided tools to work, you’ll need an account with Google. If you don’t already have one, sign up for a free Gmail account. You can either use that to manage your email, as I do (as discussed in a previous article), or you can configure it to automatically forward any mail sent to it to your “real” email account.
It’s important that email sent to this account be read. As I mentioned above, once we’re set up, Google will proactively send you notices if it finds something wrong or suspicious with your registered website(s).
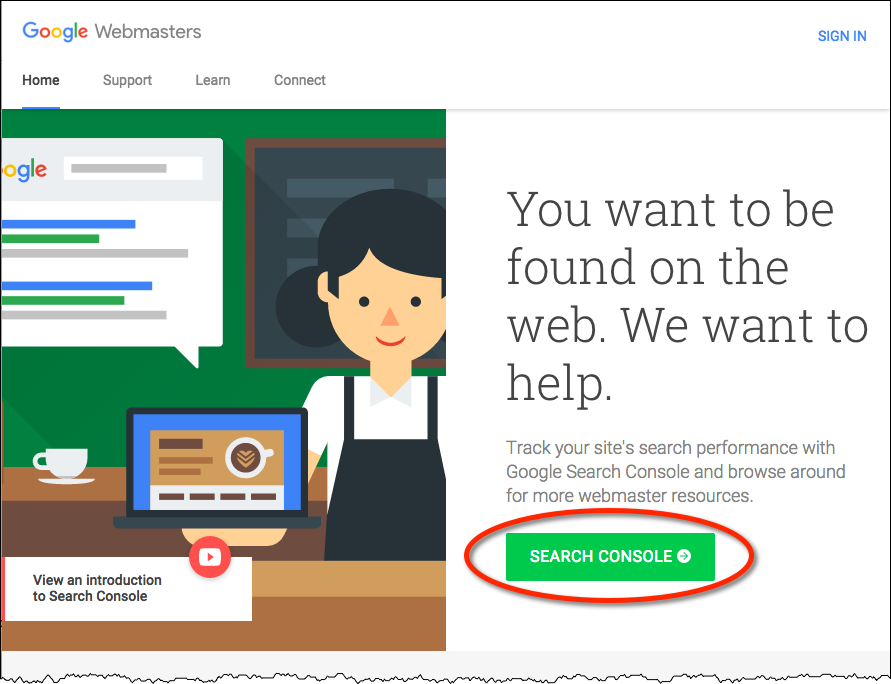
Google Search Console
Start by going to https://www.google.com/webmasters. Click on Search Console, and you’ll be asked to sign in to your Google account, after which you’ll be taken to the Search Console home.
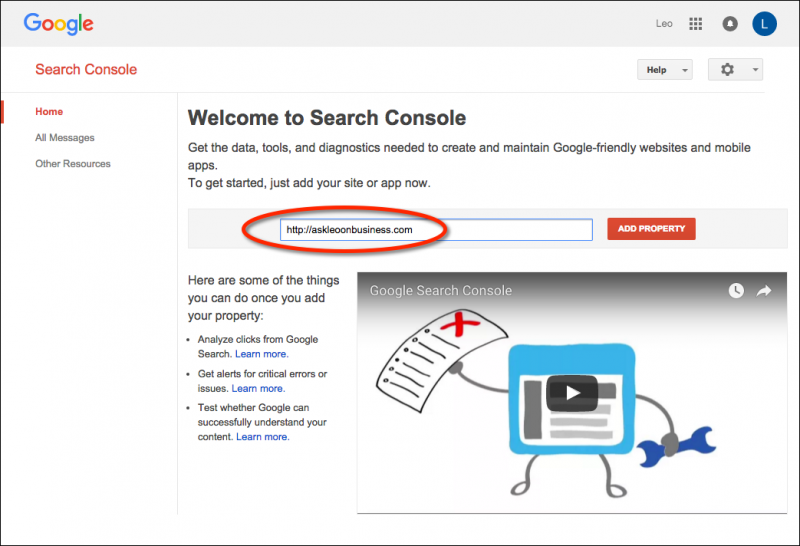
Enter the URL of your website and click on Add Property.
You’ll be asked to verify that you are, indeed, the owner of the site. The default mechanism is to upload a file that Google provides to your web site and then have Google fetch it. The idea is that if you can upload a file to the site, you must be the owner.
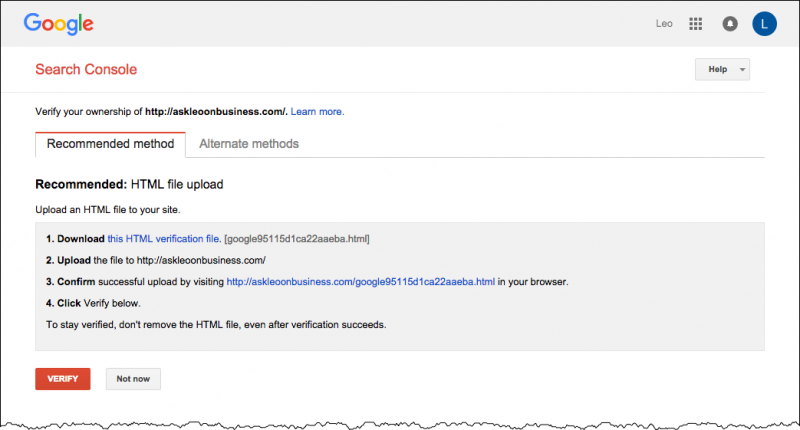
We haven’t learned about uploading random files to your website, and to be honest, it’s not something we may ever need to do, outside of what WordPress itself provides. So let’s use a different approach – an approach that one of our plugins makes easy.
Click on the Alternate methods tab, and then click on HTML tag.

We’ll place this bit of code onto our site to prove to Google that we can. Select it – from the opening “<meta” to the closing “/>”, (referred to as a “meta tag”), and copy it to your clipboard.
Now, in another browser tab, sign in to the admin area of your WordPress site. In my case, that means going to http://askleoonbusiness.com/wp-admin and logging in.
Then, in turn, click on:
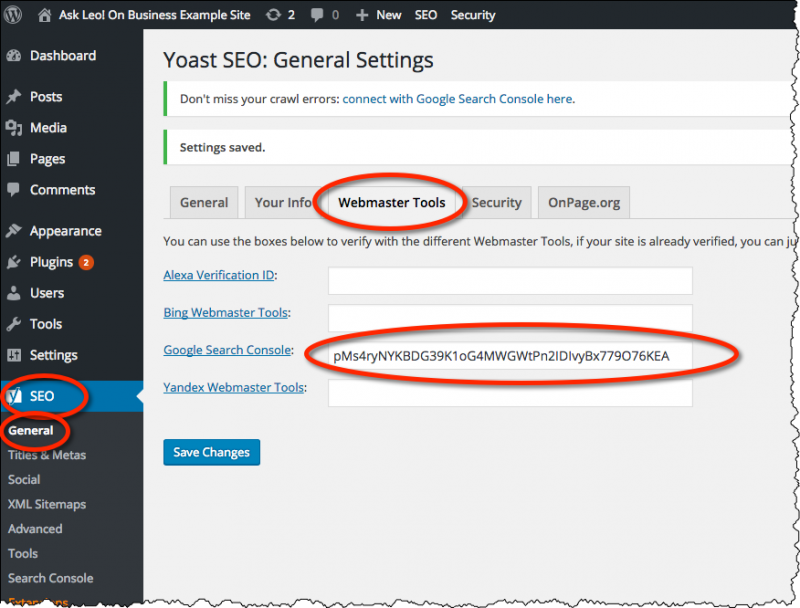
- SEO in the left column
- General, immediately beside or underneath SEO
- The Webmaster Tools tab on the resulting page
Paste the entire meta tag you copied earlier into the text box listed along Google Search Console, and click Save Changes. (Yoast SEO actually only needed the verification code itself, and will extract that from the full meta-tag when you save. If you return to the page later, you’ll see that only the code is retained.)
Now return to your Google Search Console tab in the first browser tab, and click on Verify (not shown).
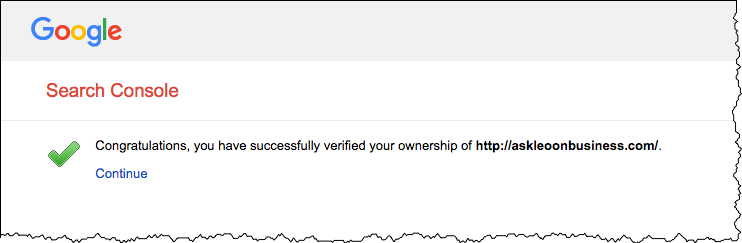
Your site has been verified, and data collection begins. Click on Continue, which will bring you to the Search Console dashboard.

As you might expect, there’s nothing to see here yet. As your site is crawled by search engine spiders – which can happen as quickly as a few hours, or as long as several weeks – Google will update this page with relevant and interesting information.
For now, though, the important thing is that we’ve hooked up the plumbing so the data collection can begin.
Google Analytics
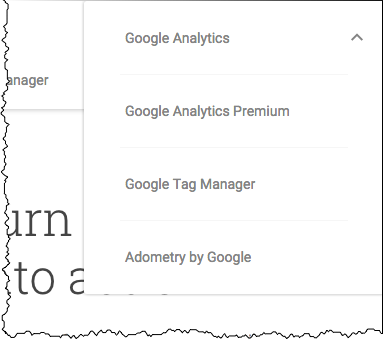
Start by going to https://www.google.com/analytics/. Click on Sign In in the upper right.

Click on Google Analytics at the top of the menu.
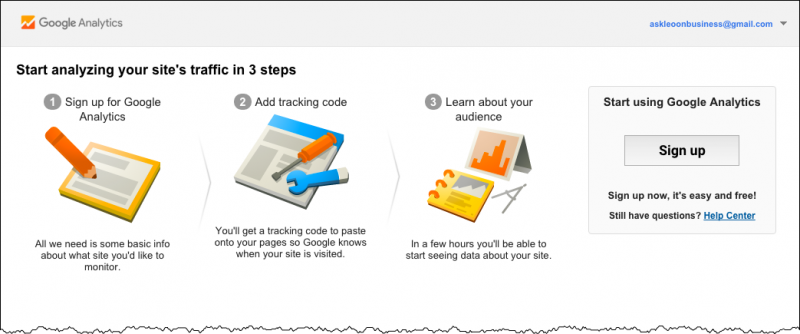
Click on the Sign up button. This will take you to a lengthy new account page.
Leaving the selection set to “Website” (not shown), near the top, we’ll fill in the requested information:
- Account Name: can be whatever you like. A business name might be appropriate.
- Website Name: It makes sense for this to be the same as the title you specified when setting up WordPress earlier, but it need not be the same. Again, whatever makes sense to you. I’ll call my example “Ask Leo! On Business“.
- Website URL: the URL at which your website is located. In my case, that’s http://askleoonbusiness.com.
- Industry Category: choose whatever is appropriate for or closest to your situation.
- Reporting Time Zone: set to your current timezone so that the results of the Analytics report will make the most sense to you.
“Data Sharing Settings” includes a series of checkboxes that allows you to control how much of the data collected by Analytics is shared with other Google services. While I recommend leaving them all checked, unchecking some or all should not impact your ability to get useful information from Google Analytics.
Click on the Get Tracking ID button near the bottom of the page. You’ll need to accept the Google Analytics Terms of Service at this point. Having done so, you’ll be taken to a page that displays your tracking code.
Now we bump into a slight dilemma: much like the Webmaster Tools code, we need to add this tracking code to our site, but that there’s no pretty interface to do so. There are, generally speaking, three options:
- Modify your WordPress theme. Not only do you need to be comfortable modifying code to do this, it’s strongly discouraged, since if the theme ever updates, your changes would be lost.
- Modify a specific file in the theme designed for local changes. This still requires that you be comfortable modifying code, as well as managing changes when the theme is updated.
- Installing a plugin. “There’s a plugin for that” is an exceptionally common solution to problems in WordPress, and this is no exception.
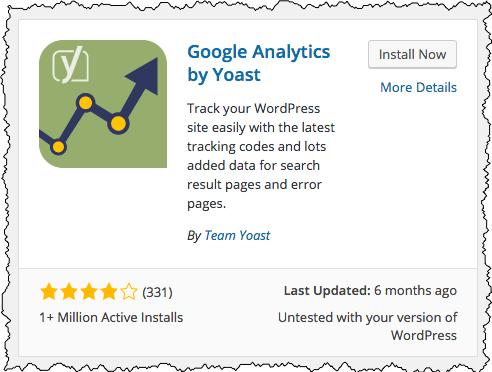
Needless to say, we’re going to install a plugin. There are many, many plugins that will do what we need, but since we’re already using Yoast SEO, I’m going recommend (and use) the “Google Analytics by Yoast” plugin.
Return to your WordPress administration page, and install the plugin just as you did the Yoast SEO plugin earlier:
- Click on Plugins in the lefthand column.
- Click on Add New
- Use the search function to search for “Google Analytics by Yoast”
- Click on the Install Now button
- Click on Activate Plugin.
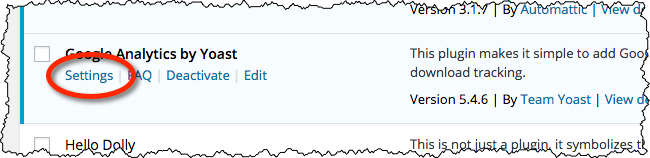
- Underneath the listed plugin, click on Settings.
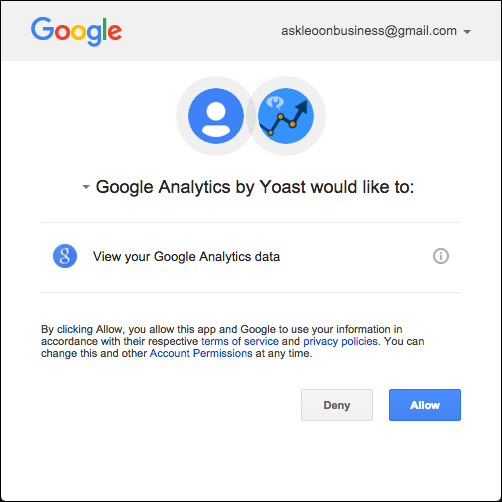
The approach used by the Yoast plugin brings many of the features of Google Analytics directly to your WordPress administration interface. Thus, in the resulting Settings page, click on Authenticate with your Google Account (not shown). Click on Allow.
You’ll be taken to a page that includes a long code.
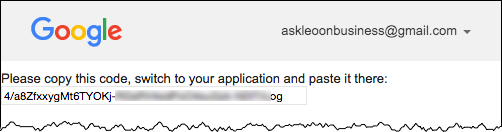
Select that code, and copy/paste it into the field provided by the Analytics plugin. Click on Save authentication code.

Finally, still in the Settings for the Google Analytics by Yoast plugin, click on Select a profile.
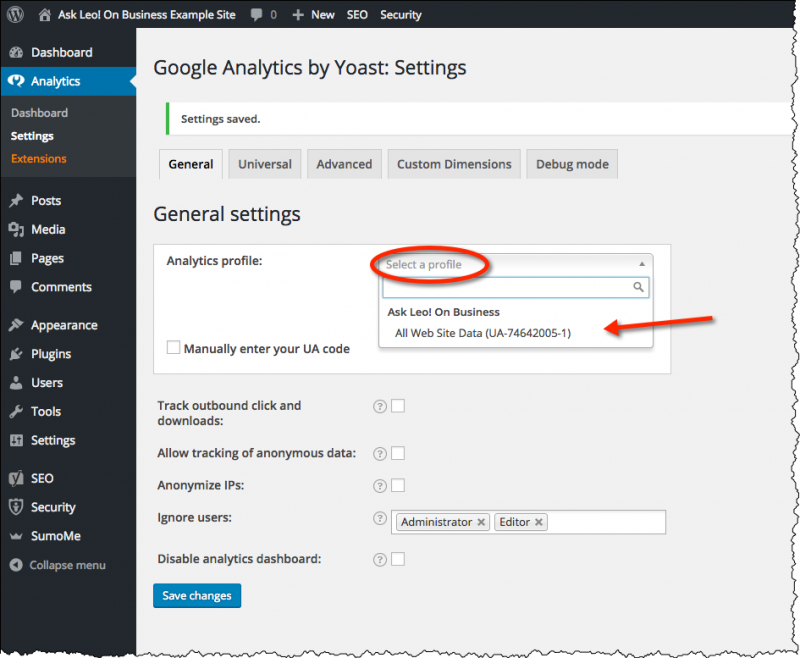
This will present a drop-down of the Google Analytics profiles associated with your account. Since we just set this up, there will be only one. Click on that.
Click on Save changes.
The analytics collection process begins.
Much like Webmaster Tools, Analytics takes some time to collect data before generating any useful information. For now, we’ll simply be satisfied that it’s in place and collecting data.
♥
We have now configured the minimum mechanics “under the hood” of our web site. Security has been set up, we’re sharable, and Google has begun collecting data about what’s happening on our site.
Now it’s time to generate some content.
That’s the next post.
Podcast: Download (Duration: 8:05 — 3.7MB)
Hello Leo,
Whilst setting up Google Analytics I received an email from them with more options such as adding “www” , “target country” etc. Is this important or can it be ignored? Thanks.
Geoff Wright
You can pretty safely ignore it all for now. I did in the example site. (Though things like adding www are also safe & easy.)
Thank you for this post.. I have a longstanding website, but when looking at the search console I found that my site has mobile accessibility problems! Got my webmaster on it now. Wouldn’t have known without your post!
Hi Leo
I’ve been following your guidance here with great interest – it’s been very useful!
I’ve a question re the “www” part of the site address. I’ve configured my experimental site as per your guidance, and in the browser bar it shows up as “http://mysite.com” rather than “http://www.mysite.com”. Is there something I’ve missed? Does it matter (either technically or from a user perception point of view)? I found some settings in Google Search Console that also to a “preferred domain” and whether to display URLs with or without the “www”. How does that relate to the overall picture. Sorry if question is a bit vague – I’m sure you can clarify!
Thanks
Chris
In the long run it’s matters very little, as long as both work. You’ll not that both http://www.askleo.com and askleo.com land you on exactly the same page. In my case I use a slightly advanced technique to standardize on the non-www version, but that’s less important than making sure that people get to your content both ways. It’s ok if the domain stays as whichever they entered.
That does not apply for subdomains, by the way. biz.askleo.com is what it is, and http://www.biz.askleo.com does not work, nor will I take the trouble to make it work.
THere is a slight benefit to choosing one and enforcing it as I have on askleo.com. As I said, that’s advanced, and I have to believe Google is smart enough to realize that they are they same thing. (There are also settings that the Yoast plugin adds that tells the search engine for each page “regardless of how you got here, this is the canonical URL for this page” which also removes ambiguity.)
Which to choose? With or without www? I have vacillated over the years. There’s a VERY minor argument in favor of each approach.
But what’s most important is that people get to your content regardless of whether they specify the www.
Dear Leo,
I have hit another problem – when I search plugins for “Google Analytics by Yoast” that plugin does not appear anywhere in the results. The top hit is “Google Analytics by MonsterInsights” Ironically the next one is “Google Analytics Top Content Widget” which says that for it to work “Google Analytics by Yoast” has to be installed first.
I have contacted Yoast but have not had a reply yet.
Literally three days ago Monster Insights bought Google Analytics by Yoast. So that’s the new one to get. (I’m not going all in on it yet, as I want to see how the new owners support it.)
I installed the MonsterInsights analytics package, and frankly, the free version leaves a lot to be desired. Unless you pay for it, you can’t get things like post hits and such. Bleah!
It should just be a fancy gateway to the information you can get for free by using Google Analytics.