I mentioned earlier that just putting a subscribe form on your web site – even if you do it on every single page – just isn’t likely to work well. The simple fact is that while you will get some subscribers, the vast majority will never act on the form.
My take is that people suffer from what some call “ad blindness” – readers have become so numb to advertising on the web, they don’t see anything static that isn’t part of the flow of the information they’re looking for.
Pop-ups are one (somewhat controversial) approach. Controversial or not, though, pop-ups work.
If you’ve been following along so far, you’ll have installed the SumoMe WordPress plugin. It’ll do pop-ups, of course, but it has some less in-your-face subscribe forms that give you more options as well.
We’ll install one of those, but first we need to talk about bribery.
The art of the ethical bribe
An “ethical bribe” is nothing more than an incentive for subscribing to your list. It’s a gift – something of actual value – you give to new subscribers after they’ve confirmed their subscription.
If the word “bribe” makes you uncomfortable, think of it as a “thank you” gift instead.
Either way, the idea is the same: in addition to promising whatever it is your mailing list will eventually provide, you give them something of value right now. (And yes, if all people want is that gift, they can subscribe, get the gift, and then immediately unsubscribe. In practice, though, few do that.)
So, what to offer?
It depends.
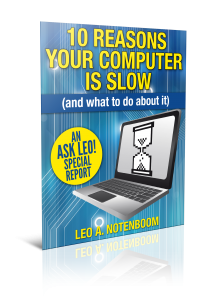
As I write this, on Ask Leo! I offer a free report, “10 Reasons Your Computer is Slow (and what to do about it)“. It’s a 38-page PDF with meaty content that addresses one of the most common topics people face when using their computer. As a kicker, it has more than ten reasons, delivering more than promised. It’s something I could sell, but instead I give away as my “ethical bribe” when people subscribe to The Ask Leo! Newsletter. (I also give it to existing subscribers who, for whatever reason, never got a copy when they signed up.)
Just about anything you produce that could be given away immediately and provide actual value to your new subscriber could be your ethical bribe.
- A PDF – a short book or report, such as I’ve done.
- An infographic that puts a complex concept or data into easier-to-understand context.
- A checklist presenting an overview of a process people may be unclear on.
- An instructional video.
- An informative audio or podcast episode.
Understanding the value here is simple: ask yourself what’s in it for them?
Then give that to them in exchange for trusting you with their email address.
Installing the SumoMe Scroll Box
Visit your site’s WordPress administration page. Since you’ve installed the SumoMe plugin, in the upper right there should be a small blue bar visible.
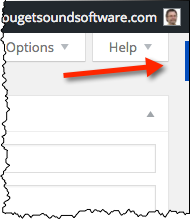
Hover your mouse pointer over that and it’ll expand to the SumoMe crown.
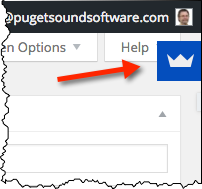
Click on the crown and SumoMe’s login dialog will pop up (not shown). Log in with your SumoMe account credentials. Once you’re logged in, the single crown will be replaced with the full SumoMe access control.
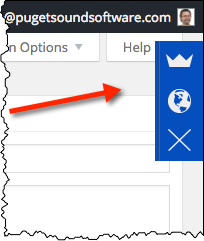
Click on the crown to bring up the SumoMe Home.
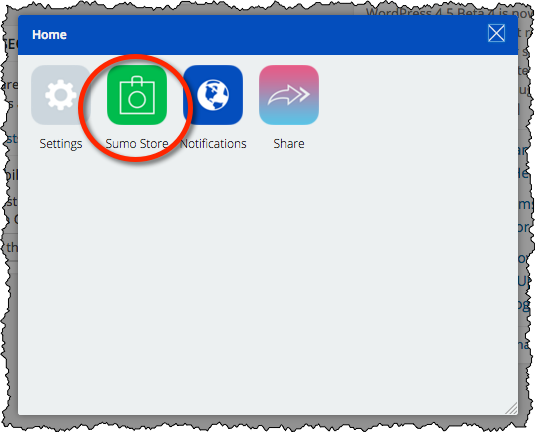
Click on Sumo Store to open up the list of available SumoMe items.
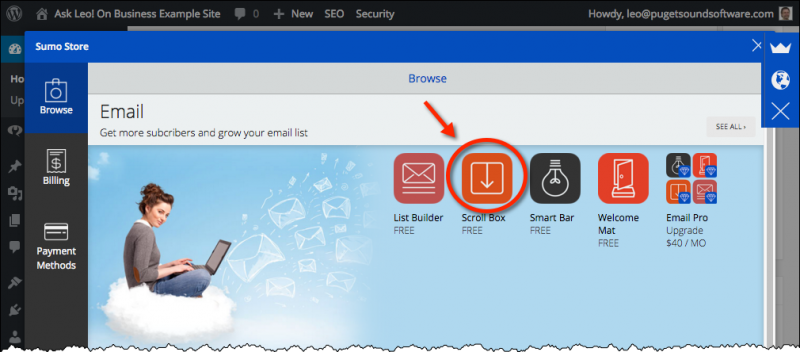
There are several items of interest in that first “Email” section:
- List Builder – a traditional pop-up subscription form. You may have seen it in action on Ask Leo!
- Scroll Box – a slide-up that appears under conditions you set. I use this on HeroicStories.
- Smart Bar – a bar that appears across the top of your site with your offer.
- Welcome Mat – an interstitial page that appears under conditions you set, typically when someone visits your site for the first time.
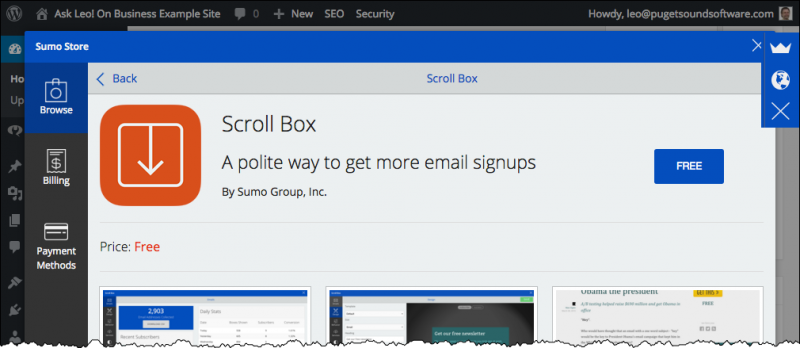
Scroll Box is what we’ll install today, so click on that. You’ll be taken to a page with a more detailed description of this tool.
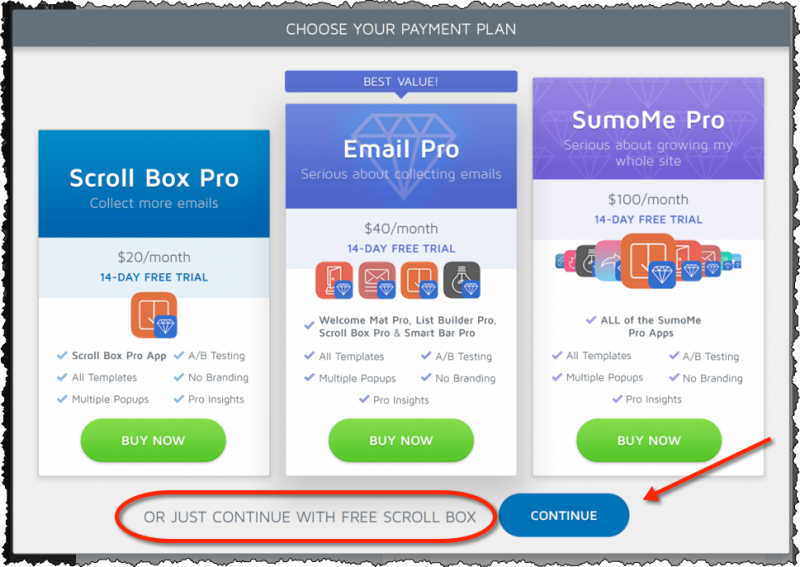
To the right is a button labelled FREE. Click on that and it’ll change to OPEN, indicating Scroll Box has been installed. Click on OPEN and you’ll be presented with payment plan options. Don’t let that scare you – just scroll down.
Near the bottom, click on CONTINUE to continue with the free version of Scroll Box. Should you decide you want some of the features included in the paid versions of the tool you can always upgrade later.
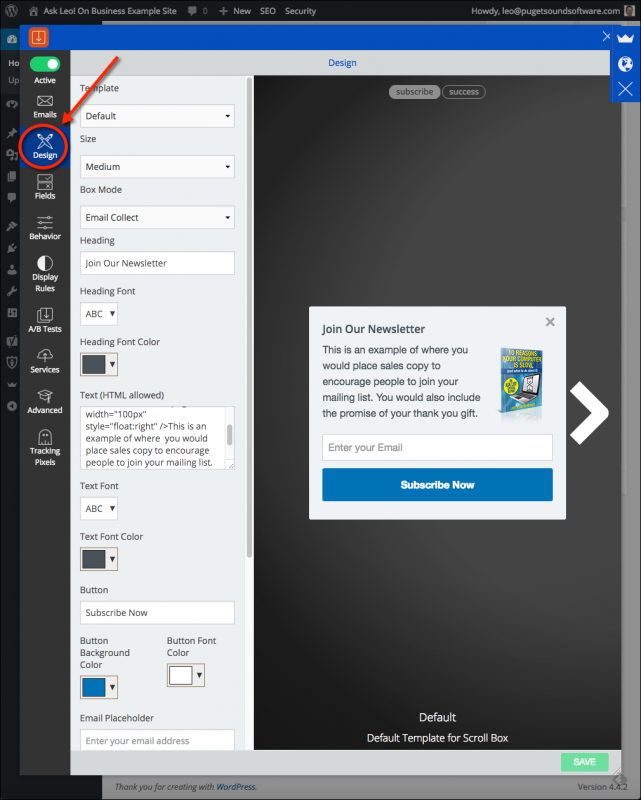
This will take you to the Scroll Box administration interface. Click on the Design icon on the far left.
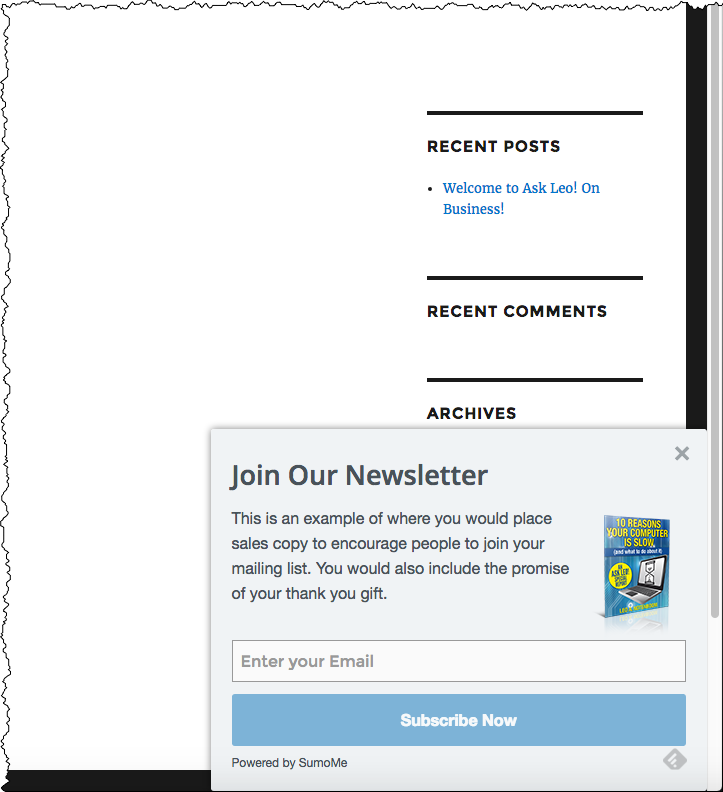
On this page we’ll simply define what we want our sign-up box to contain. You can describe your newsletter, explain why people would want to subscribe, and offer your ethical bribe. Feel free to play around with the settings that Sumome provides – the example box will be updated as you make changes, so you can see the result you’ll be getting.
Be sure and click the Save button at the bottom when you’re done making changes on this page.
Next, Click on the Behavior icon on the left.
I’m not going to change much here; the decisions are really yours to make. There is one important setting, though, and that’s the “Success Redirect URL”. This is the page readers will see after submitting their email address. Since we are confirmed opt-in, that would be the “Confirmation Needed” page we created when we set up our list with Aweber.
Click Save, near bottom of the window.

Speaking of Aweber, now we need to make that connection. Click on the Services icon on the left. You’ll be presented with a lengthy list of services to choose from.
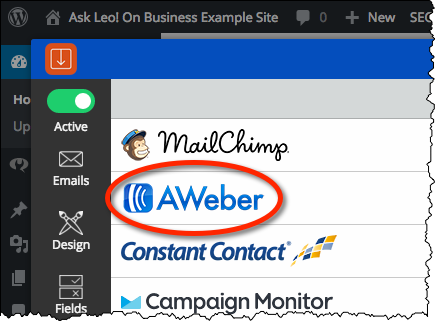
Click on the service you use. Since our example is about Aweber, I’ll click on that, which will bring up a single button for you to click on. Click on Connect. This will open a new window for you to login to your Aweber account.
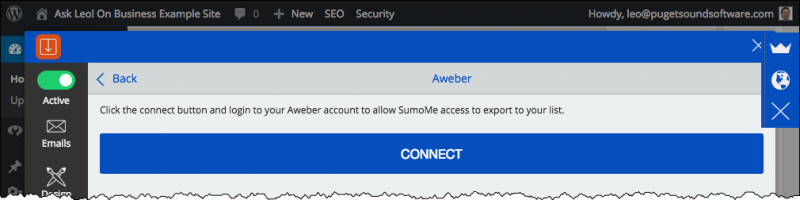
This gives your blog, and specifically the SumoMe plugin, access to your mailing lists managed by Aweber. Enter your Aweber log-in name and password, and click on Allow Access.
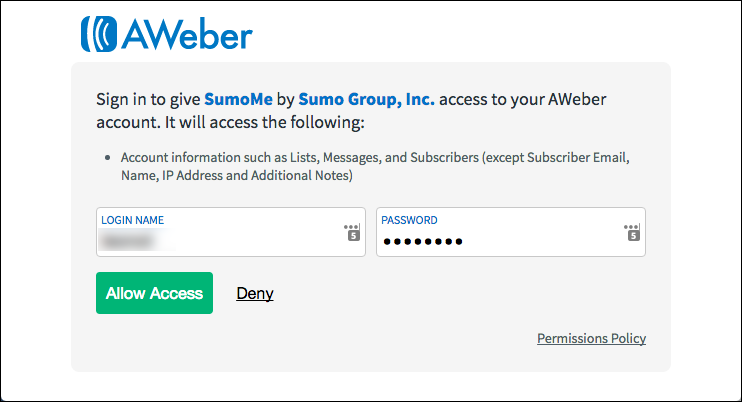
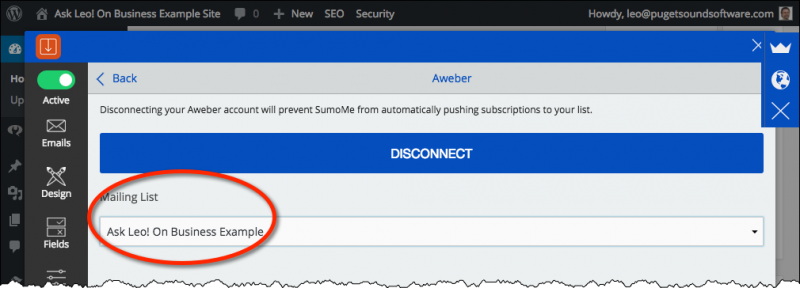
This brings up one final choice. You may only have one list right now, but it’s very possible – likely, even – that eventually you’ll have more. Here you’ll need to select which list is to be used. Make that selection and click Save.
You’re done. You have a Scroll Box!
Return to your site’s home page, refresh, and scroll down to see the results.
There’s one last detail we need to complete before we can really say we’re done.
Your first follow-up
When people sign up to your mailing list, they’ll have been taken through this path:
- They sign up using one of your forms.
- They are taken to the “Confirmation Needed” page.
- They get the confirmation email and click on the link in that email.
- They are taken to the “Final Confirmation” page.
Wouldn’t it be nice if they now got an email from you welcoming them to the list? Perhaps reminding them of the thank you gift you promised?
While it is optional, it’s more than just nice. It’s “best practice”.
We need to set up an automated “follow-up”.
First we need to understand a couple of terms.
- Follow-up: also referred to as an auto-responder, a follow-up is a pre-defined email that is sent out automatically based on some conditions that apply to each subscriber individually. Joining your list might be one such condition, but another common one is “X days after we sent the previous message”. A good example is The Best of Ask Leo! mailing: it’s a collection of over 200 emails that are all ready to go. When someone subscribes, they get the first. A week later, they get the second. A week later, they get the third, and so on. Completely automated, this type of follow-up-based list just goes on until it runs out of emails to send.
- Broadcast: this is an email sent to everyone on your list at your instruction. For example, The Ask Leo! Newsletter is a weekly broadcast. Each week I or my assistant take the steps to assemble the current newsletter and send it out to my subscribers.
Even though my weekly newsletter is sent as a broadcast, it has at least one automated follow-up: when you subscribe, it sends you a welcome message.
Let’s set that up for our example list.
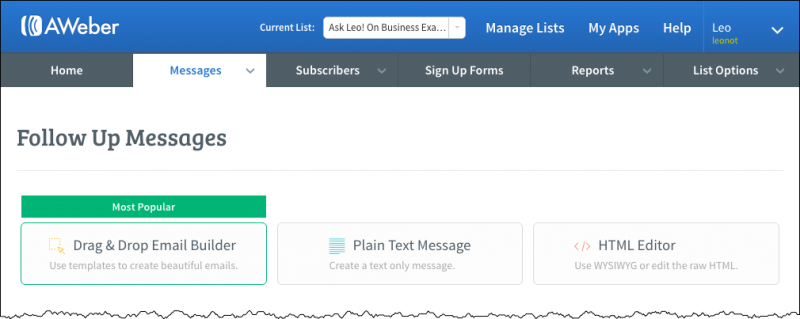
Log in to your Aweber account. If you have more than one list, make sure the list you want is selected, and then hover your mouse over the Messages menu.
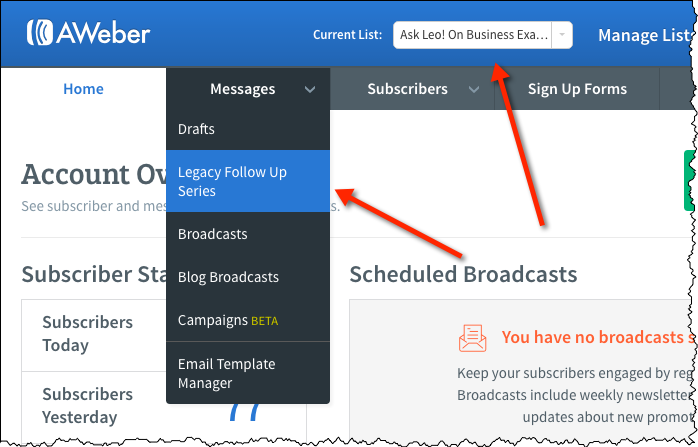
Click on Legacy Follow Up Series. Since you have no messages as of yet, you’ll be presented with a choice of which type of editing approach you want to use to create your first. Unless you have a strong preference otherwise, click on Drag & Drop Email Builder to open that.
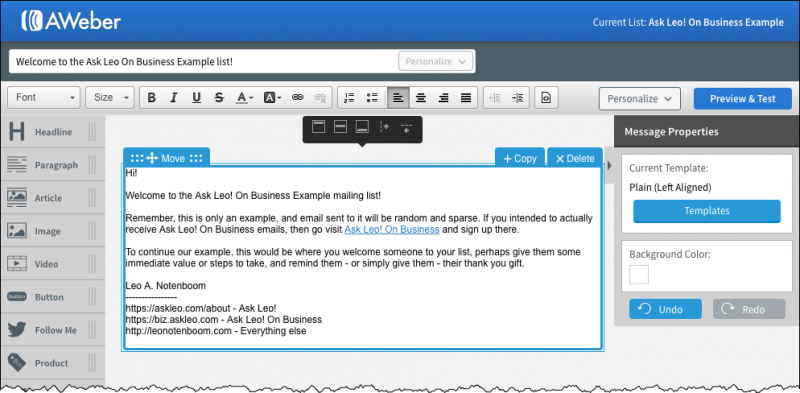
Compose your welcome email. Make sure it welcomes people to your list, and gives them information about the list again, perhaps including information on how to contact you. This is also a good place to remind people about their thank you gift, or even give it to them (usually by linking to a page on your site where they can access or download it).
You can click Preview & Test in the upper right if you like, to test the email by sending yourself a copy before you’re done.
When you are done, click on Save & Exit, at the bottom. This will take you to the collection of email draft messages (as of yet, there should be only one).
Click on Send Options, and then Add to Follow Up Series.
Since this is the only follow-up message so far for this list, there’s only one place for it to go: it’s the welcome message sent when someone signs up. (If you were configuring a full follow up sequence, you would be able to adjust the order of messages sent here.)
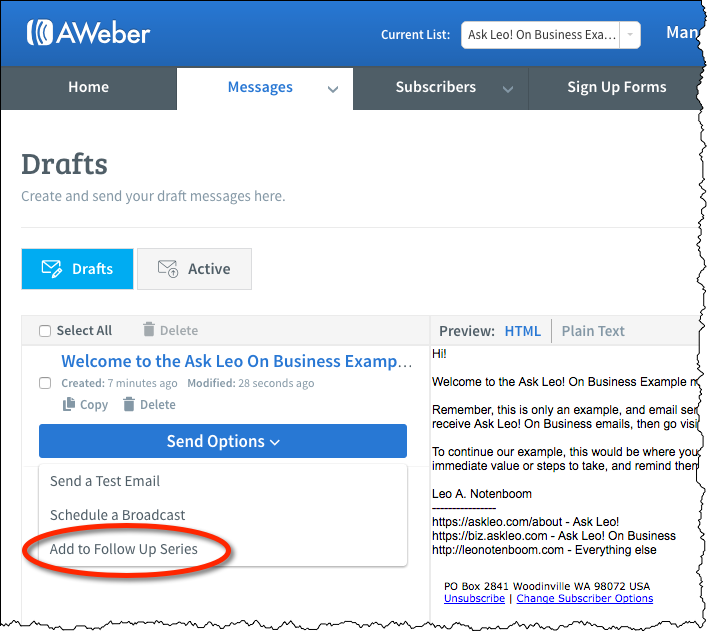
Click on Add to Follow Up Series.

That’s it! Your list now has a welcome email that will be sent whenever anyone subscribes.
Now … go subscribe to your own list! Seriously, this is one of those easy-to-forget steps, but can be extremely useful to alert you to issues with your list, your messages, or just about anything else related to your mailing list.
♥
We have a list. We have sign up forms. We have thank you gifts (or at least places for them) and we have a welcome email.
Next, we’ll hook up your site so sending a message to your list is no more work than simply publishing your next post.
Podcast: Download (Duration: 10:09 — 9.3MB)
Hey Leo,
Great information.
Unfortunately, I’m unable to connect the SumoMe scroll box to my mailing list on AWeber. It says that I need to be a paid SumoMe user to do this.
So I used mailmunch.com in place of SumoMe to add a pop up subscriber box.
Thanks again,
Sean
Interesting. I’ve been able to hook it up with the free version.