In the previous post, I mentioned several different email service providers (ESPs). These are online services that maintain your email list and provide easy interfaces to create and send newsletters and other communications. I personally use, and recommend, Aweber. It’s not the least expensive, but it is, in my opinion, the best value for getting your email delivered, helping you along the way, and encouraging best practices.
I want to give you concrete examples, so in this article I’m going to create and configure a mailing list using Aweber. If you choose a different ESP, the concepts will still generally apply, but the specifics will naturally be different.
Create an Aweber account
Start by going to Aweber and creating an account, if you don’t already have one.
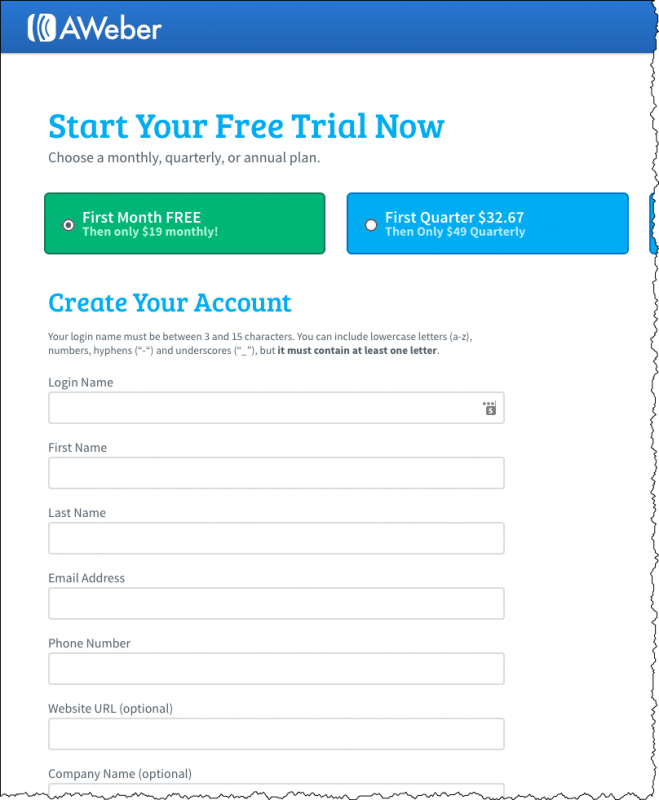
It’s up to you how long you want to commit to, or how often you’d like to be billed. Full disclosure: the pricing is based on the number of subscribers on your list, and can increase as your lists exceed certain sizes. Totally worth it, in my opinion, but important to know up-front.
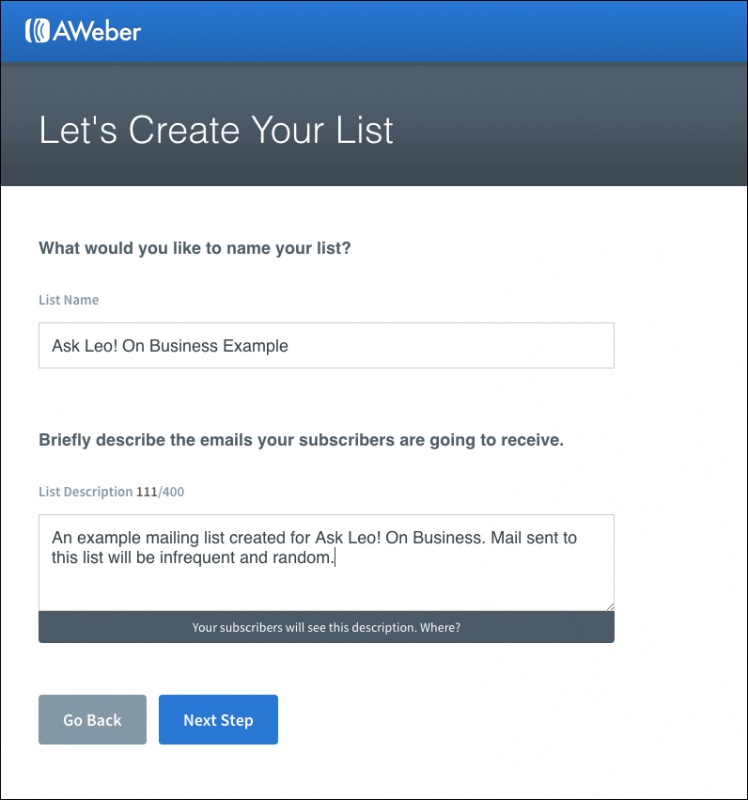
Create your list
Once you’ve created and logged into your Aweber account, if you’re not automatically taken to the “Manage Your Lists” page, click on Manage Lists in the upper right.
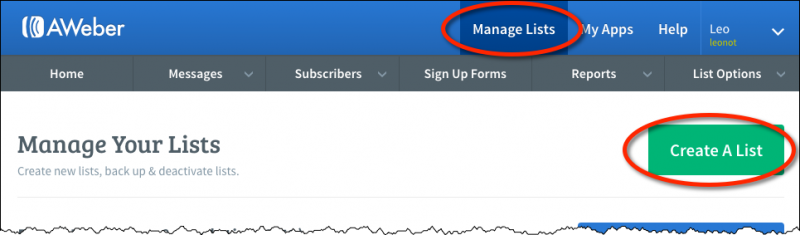
Click on the big green Create A List button, and you’ll be taken to the first step of the process.
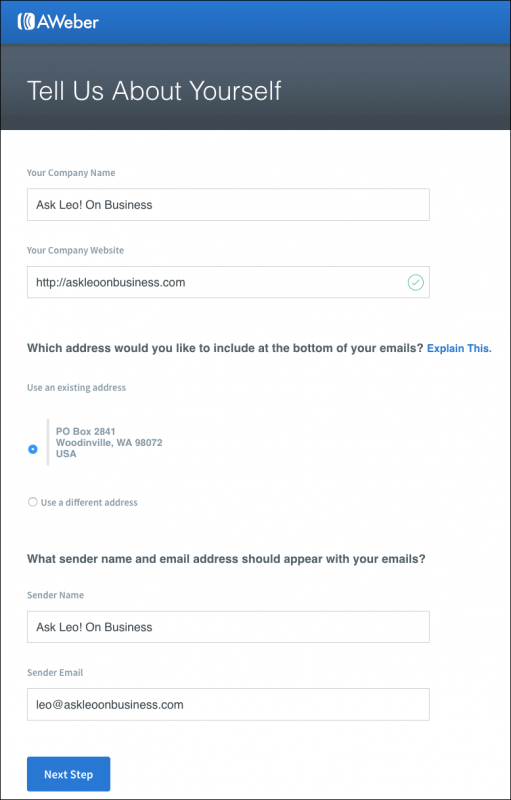
Fill in your company name and website with appropriate information. Don’t worry if you’re not technically a “company” – your organization name, or even your own name, will do. This will identify who you are to your subscribers, so just choose something that’s appropriate.
The CAN-SPAM act – a set of U.S. regulations regarding bulk email – requires that you include a physical mailing address in each email. Aweber will add this automatically for you, but it needs to know what to add, and will use the address you specify that here. If you leave it blank, Aweber will default to the address on record with your Aweber account.
Important: this is public information. Not unlike your DNS registration that we discussed some time ago, make sure this is an address you’re comfortable sharing with the public. I use a Post Office box. If you have a physical location for your business, it would make sense to use that.
The Sender name and email address define what appears in the “From:” line of the email sent to the list.
Click on Next Step.
This list name is used in several places, and the description will be seen when subscribers unsubscribe, letting them know what they’re unsubscribing from.
Click on Next Step.
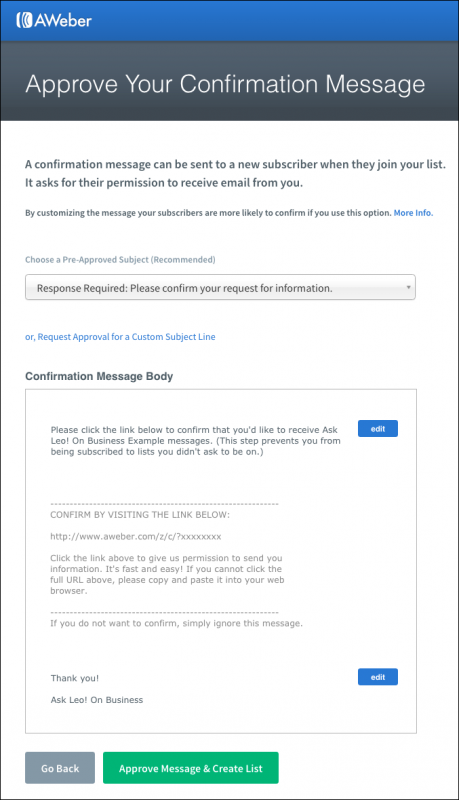
When someone subscribes to your list, they’re sent an email message that contains a link that they must click on in order to complete their subscription. This “confirmed opt in”, as it’s called, is industry best practice to prevent people from being subscribed against their will (anyone could have filled in their email address), and in turn possibly calling you a spammer.
You can select from a set of pre-approved subject lines, or submit a custom subject for approval. You can also modify portions of the body of the confirmation message itself. In general, one of the pre-approved subject lines will do. While not neccessary, I like to do a little customization to the body of the message to make it a little clearer. Don’t get too wordy, though; otherwise, people will overlook the confirmation link and not complete their subscription.
Once you’re satisfied with the message, click on Approve Message & Create List.
You now have a mailing list!
We’re not quite done, of course. Let’s customize some default settings and pages.
Create the first confirmation page
When people enter their email address on your subscription form (which we’ll create soon), and click Submit, two things will happen:
- They’ll be emailed the confirmation message that we customized above.
- They’ll be taken to a page that tells them to go look for that confirmation email they were just sent.
I call this the “confirmation needed” page.
Aweber provides a default page, but it’s a much better experience for subscribers if they see a page from your site instead.
On a different browser tab, log in to WordPress so you can edit your site. Using the same techniques as we used before to create the “About” and “Contact” pages, create a page titled something like “Thanks, but you’re not done…”. On this page, explain that they should go check their email for the confirmation message.
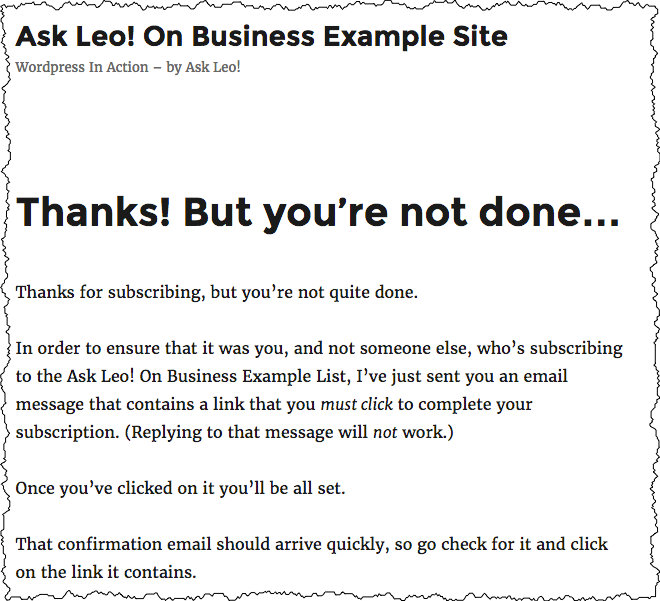
Note the URL for this page that you’ve created (my example is http://www.askleoonbusiness.com/thanks-youre-not-done/); you’ll need it shortly.
Create the second confirmation page
Once people click on the link in the confirmation email, they’ll be directed to another page you can provide that thanks them for completing their subscription. I’ll call this the “final confirmation page”. (If you had an offer or gift for subscribing, you’d present it on this page.)
Once again, create a page in WordPress for this purpose, called something like “Thanks for subscribing!”
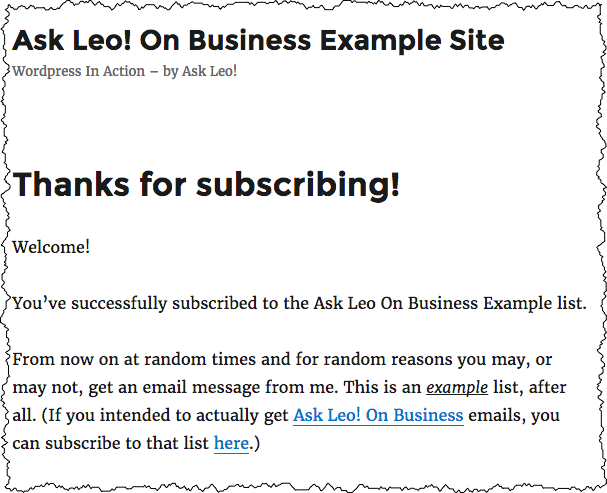
And again, note the URL for that page (mine’s http://www.askleoonbusiness.com/thanks-for-subscribing/) so we can hook it up in Aweber.
Tweak the list configuration
If you have more than one list at Aweber, make sure the list you want to work on is selected in the “Current List” drop-down at the top of the page.
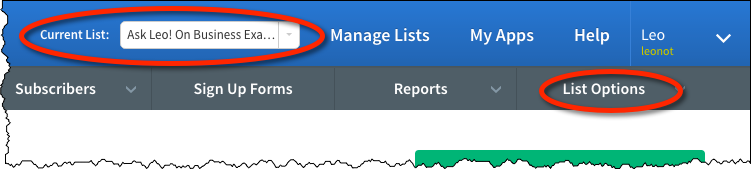
Click on List Options. This will take you to the first of three pages where you can edit the information about the list that you provided earlier, and adjust some additional settings.
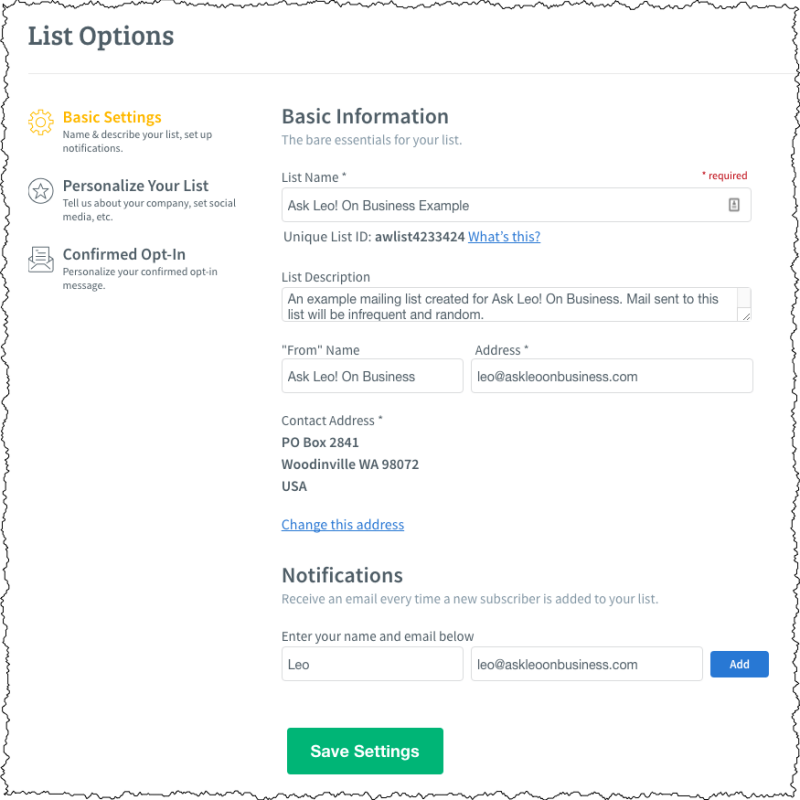
On this first page of options is a “Notifications” settings. When you provide an email address here, each time someone subscribes to or unsubscribes from your list you’ll be sent a notification message. I find this useful.
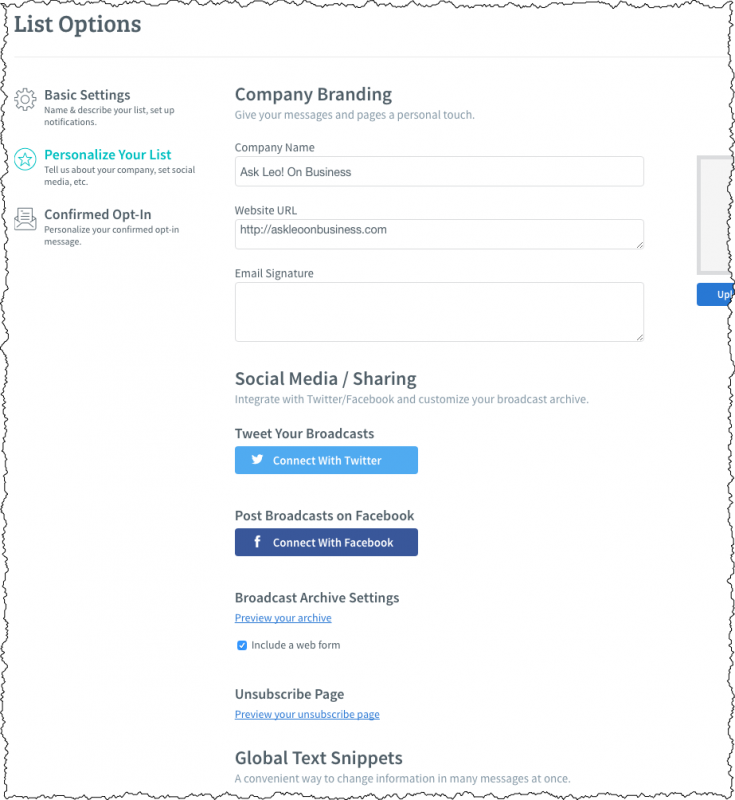
Click Save Settings, and then Personalize Your List on the left, to move to the next page.
This page allows you to change and enhance your company branding by including a logo, as well as adding an email signature. Whether or not you add a logo depends on whether or not you choose to use some of the features we’ll discuss next. There’s certainly no harm in uploading one.
You can hook up your Twitter and Facebook accounts so that Aweber automatically generates a post each time you send an email. I tend not to use this myself, preferring instead to make manual, more personalized, posts in conjunction with my emails.
The broadcast archive is exactly what it sounds like: an archive maintained at Aweber of your mailings. Again, I tend not to use this, as my website is my archive, and I recommend you do the same. (There’s no setting here; turning it on or off is a choice you’ll make later when you actually set up a mailing.)
You can preview your Unsubscribe Page to see the impact of any changes you might have made.
Global Text Snippets are an advanced feature I won’t cover here.
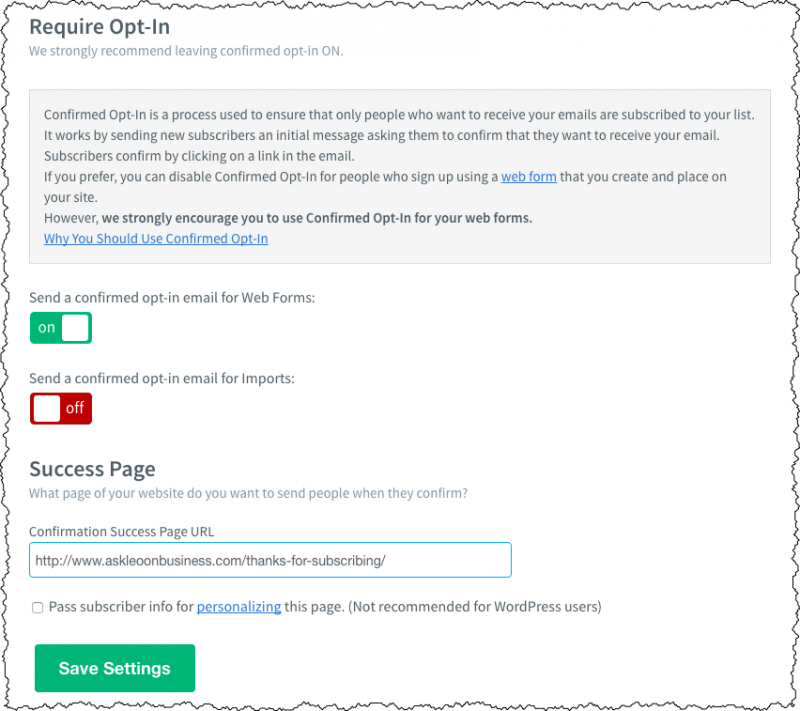
If you’ve made any changes, click on Save Settings, and then click on Confirmed Opt-In on the left to move to the final page of list options.
The top part of this page (not displayed below) is the confirmed opt-in email message you configured earlier. Here you can make changes.
Below that, however, are options for confirmed opt-in itself. Specifically, you can turn it off.
Don’t.
Requiring that someone confirm their subscription is important for a variety of reasons, but I’ll mention the two most important, from my perspective:
- Your list will have on it only those people who really want to be there. This makes your list much more responsive and valuable to you.
- You’ll be less likely to be labelled or considered a spammer, and much more likely to be delivered to the inbox rather than the spam folder.
The Success Page is the real reason to be here. Set this to the URL of the second or “Final” confirmation page that you created earlier. (Yes, this seems backward. We’ll use the “Confirmation Needed” page in our sign-up form.)
Click on Save Settings.
Now that we have a list, we need to make it possible for people to subscribe.
Create a Subscribe form
At the top of the page, click on Sign Up Forms. Then click on Create Your First Sign Up Form.
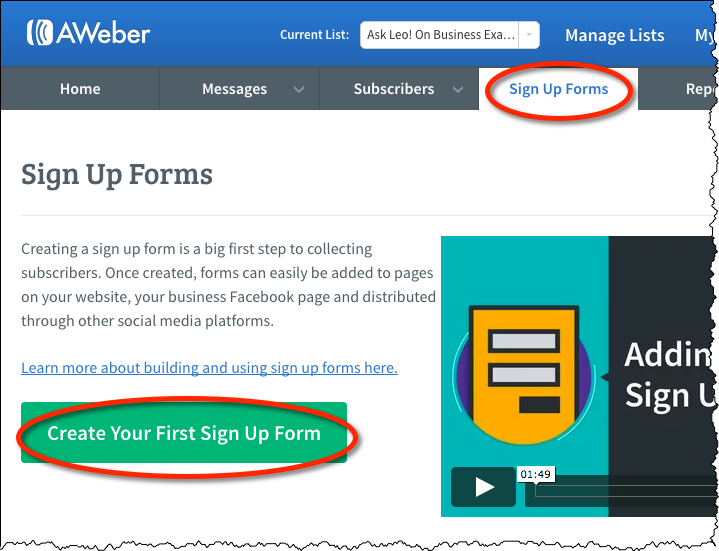
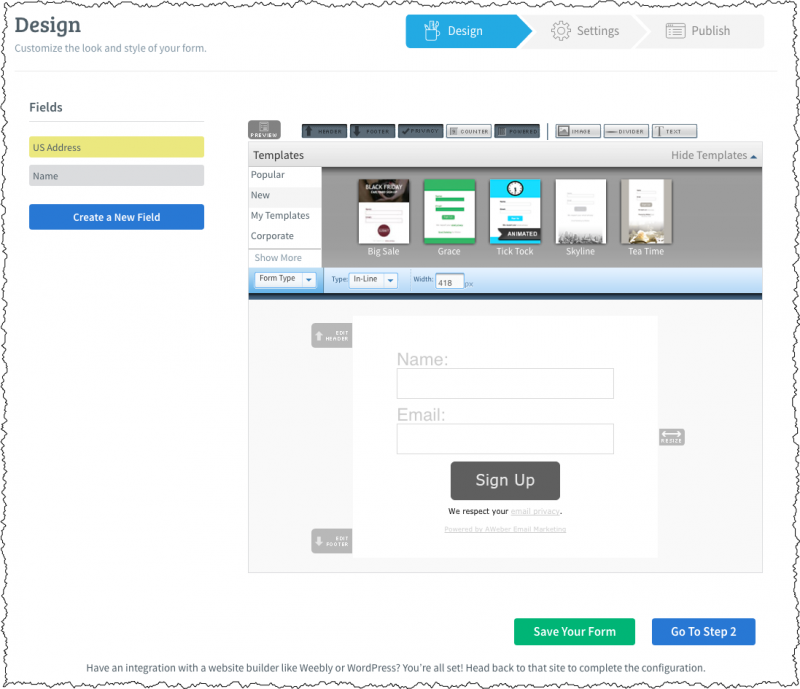
I’m not going to dive into all the nuances of form design here. What’s important for our example today is to get a basic form ready for use. The default design will do nicely for this, so just click Go To Step 2 at the bottom of the screen to move on.
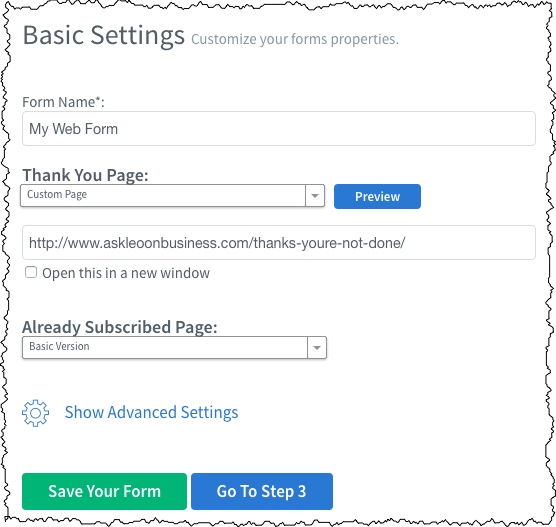
There’s one important change to make here: what Aweber refers to as the “Thank You Page” is really our “Confirmation Needed” page. In the drop-down menu under “Thank You Page”, select “Custom Page” and then enter the URL for your “Confirmation Needed” page. My example would be http://www.askleoonbusiness.com/thanks-youre-not-done/.
Click Go To Step 3. You’ll be asked to save your form, which you should do, before you’re taken to the next page.
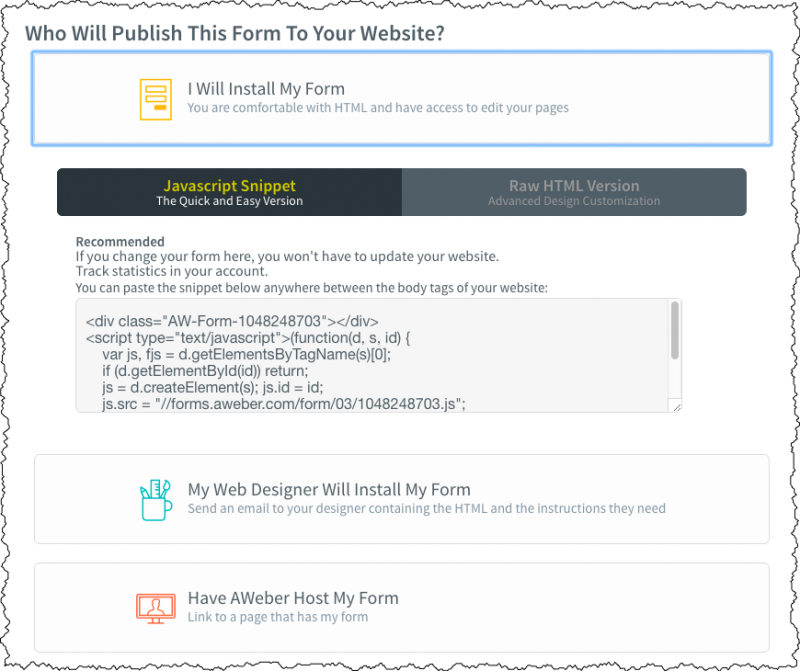
Next you are presented with several options for installing your form. I’m going to assume that you want this form on your site and not Aweber’s (this eliminates the third option), and that you’ll be doing it yourself (which leaves us with only the first). Click on “I Will Install My Form”, which will display the Javascript Snippet we’ll use.
Click anywhere in the Javascript that’s displayed, and it’ll all be selected for you automatically. Right click and click on Copy to copy it to your clipboard. (You can return to this later if you need to grab it again.)
Install your form
In another browser tab, log in to the WordPress administration interface for your website. In Appearance in the left hand menu, click on Widgets.
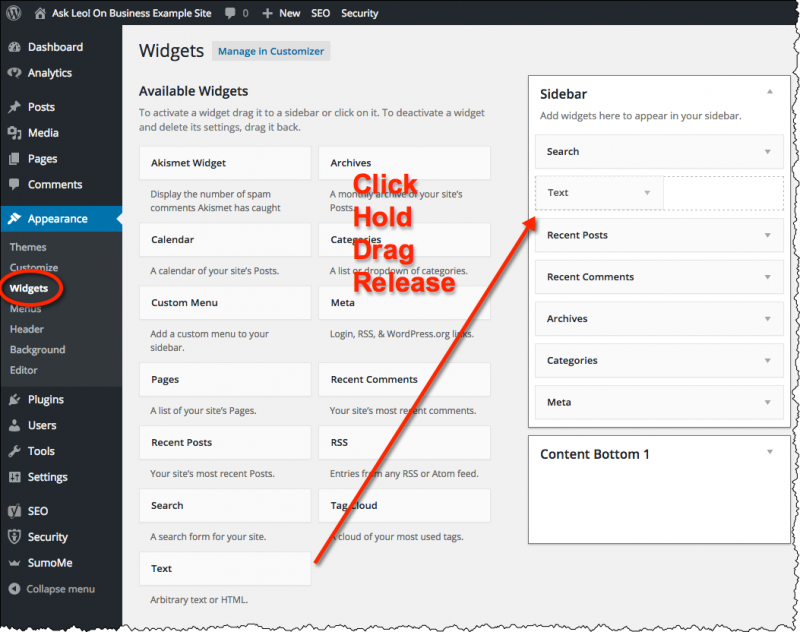
Click-and-hold on the “Text” widget, and drag it onto the displayed “Sidebar”, just below the “Search” widget, and release.
The widget will expand into an editable text box.
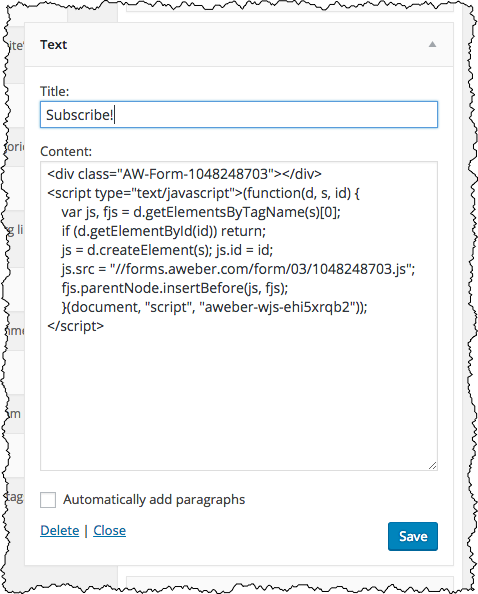
In the “Title” field, enter “Subscribe!”, and then, into the “Content” box, past the Javascript we copied from the Aweber page.
Click Save.
You now have a subscribe form on your site.
Subscribe yourself
Of course, the very first thing you should do with your brand new subscription form is to subscribe! Visit your site and you’ll find the form in the sidebar.
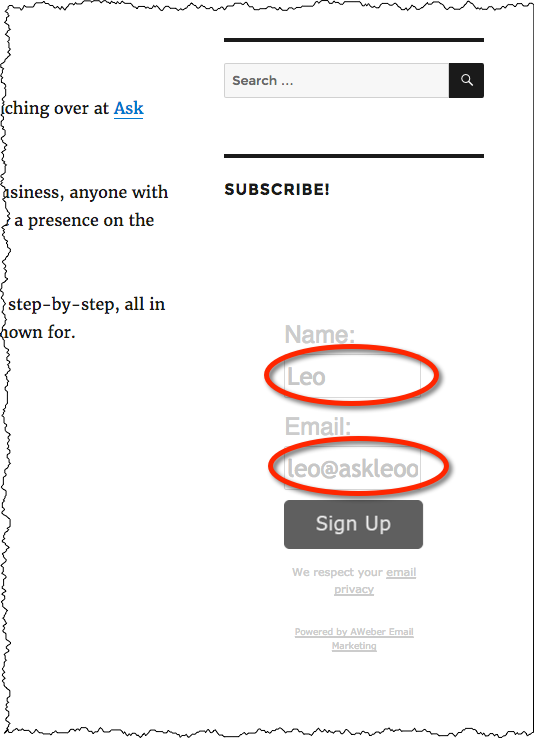
Fill in your name and email address and click on Sign Up.
You’ll now be taken through the sequence of:
- “Confirmation Needed” page
- Confirmation email with link
- “Final Confirmation” page
Now you know just what your subscribers will experience.
♥
Once again, we’ve done a lot. Not only do you have a list, but you have a sign-up form and a subscriber – yourself!
Next we’ll use Sumome to add a more active subscribe form, and we’ll also craft something important, yet still missing, from the instructions above.
Podcast: Download (Duration: 10:53 — 10.0MB)
Hey Leo,
Thanks so much for making this guide.
I’ve got my website up and running and I’m trying to create a mailing list. I don’t have a lot of funds at the moment so I’m looking for a free alternative.
Bluehost recommended Dadamail so I’m trying to install it on my website. I’ve been following along with Justin’s installation video on youtube (https://www.youtube.com/watch?v=s5vTHUpC-n8). However, I’m stuck at the SQL backend step (around 7:20 in the video).
I have now idea what an SQL is or how to implement it at this stage.
Do you have any suggestions?
Thanks,
Sean
Hey Leo,
I got Dadamail installed, but I decided it wasn’t worth the headache. Now, I’m not sure how to uninstall Dadamail. 🙁
I’ve set up a new mailing list with AWeber.
Thanks for this guide…it’s fantastic!
Sean